
Freelancing websites like PeoplePerHour and Upwork can be a fantastic way to launch your online freelancing career, especially for beginners. If you’re serious about being a successful freelancer, the most important thing you need to do is to create a strong freelance profile to win new projects and attract potential clients.
However, you can’t simply register a new account, fill out some random text, and wait for the clients to come, expecting to have a high degree of success.
It’s not that simple!
There are over 75,000 freelancers on PeoplePerHour (PPH). Yet, only 2673 freelancers have completed more than 50 projects, roughly 3.6% of all freelancers. Less than 0.5% (409 total) are ranked as Top Cert freelancers, a rating given to those with the highest level of customer service, income, and project success.
PPH is one of the most popular freelancing websites right now. It is one in which I have had a lot of success with over 275+ positive reviews. But, you can apply this information to create impressive Upwork profiles as well.
How can you get clients and be among the top-ranked freelancers?
While competition on these platforms is intense, it’s not impossible to win good quality, well-paying clients.
Your profile is one of the first things a potential client looks at when deciding who to hire for a project. You want to give the best impression you can.
In this post, you will learn a step-by-step approach to set up an impressive freelance profile on PeoplePerHour so you can win new clients and get your first project.
Fill in Your Freelance Profile
Step 1. Go To Edit Your Profile
First, log in to your PeoplePerHour (PPH) account or create a new account.
Next, on the upper right corner of the page, you will see your profile photo or a blank icon. Click on this circle. Then, in the drop-down menu, click on Profile. This will take you to your freelance profile page.
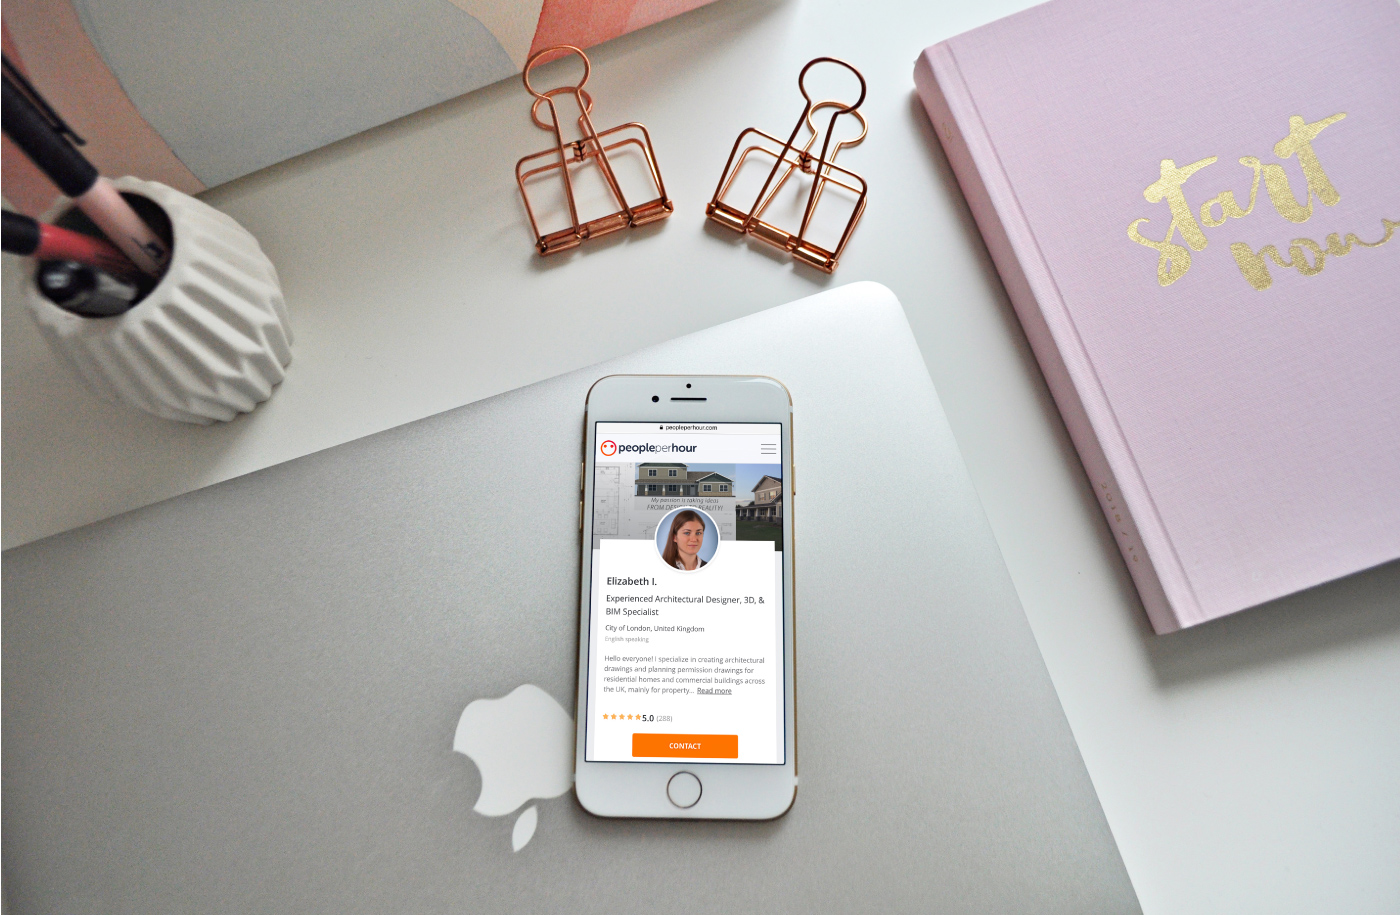
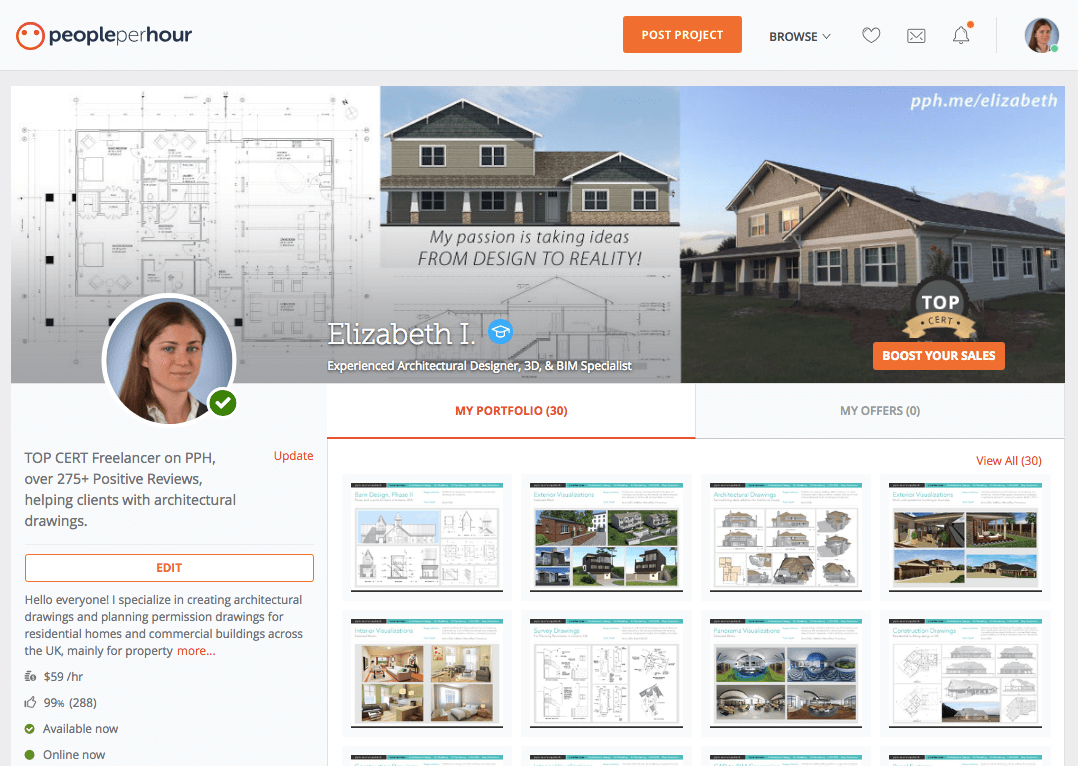
Here’s a screenshot of the typical profile page you will see when you’re logged into your freelancing account on PPH. I’ll use my own profile as an example.
The NEW profile page on PPH (updated November 2018):
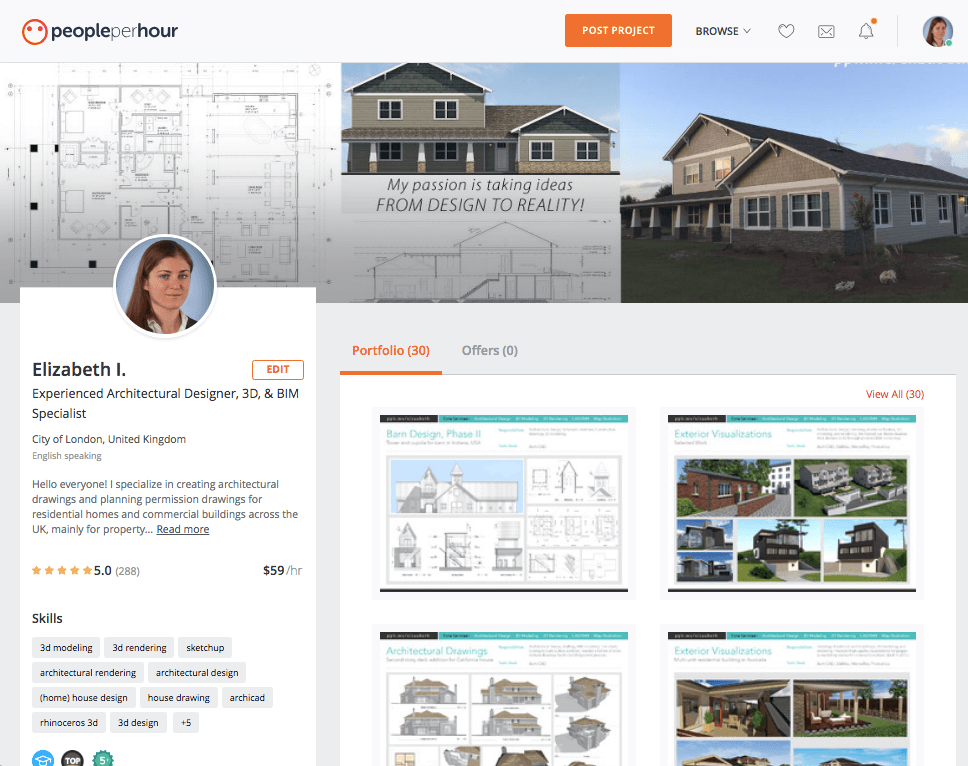
The OLD look of PPH’s profile page:
To begin editing your freelancing profile, click on the Edit button on the left-hand side of the page.
You’ll be redirected to a page where you can update all of the details on your profile.
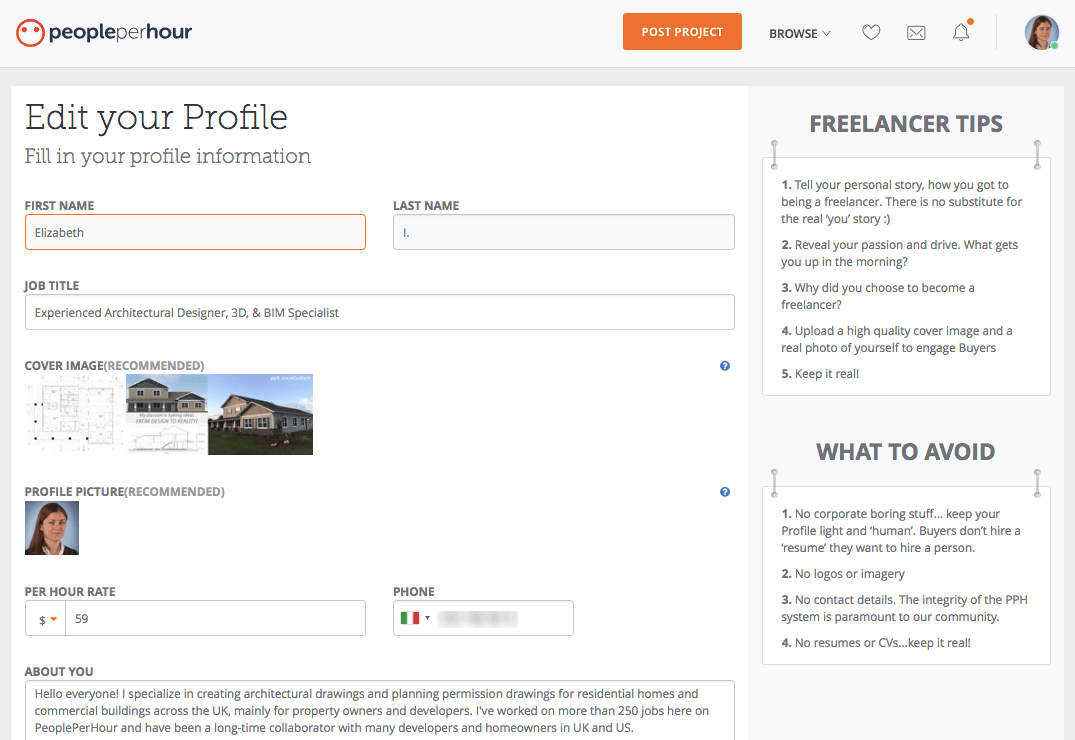
Step 2. Add Your Name
Add your real name when creating your freelancing profile.
Don’t use a nickname or a fake name. You’ll be interacting and communicating with clients on a regular basis, and it’s more personal and authentic to use your real name.
On PeoplePerHour, only the first letter of your last name will be published. Your full last name is not shown in search results or in the URL of your freelance profile.
Don’t worry if your name is hard to spell or doesn’t sound impressive.
If you are representing a business or team of people, I recommend using your first name followed by your business name. Or, leave out your business name here, and put it into the description. Try to avoid using only a business name on your profile (at least until you have a more established profile), as clients prefer to know with whom they are speaking.
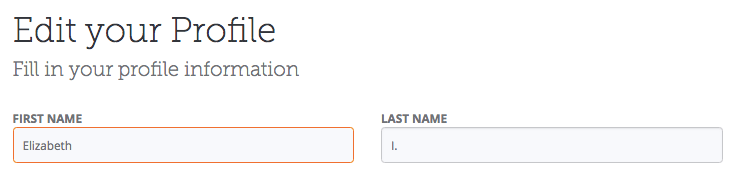
Step 3. Add Your Job Title
The next step is to specify your job title. This should describe what you do. Be specific and straightforward about your profession or role within the freelancing community.
This headline is one of the most important aspects of your profile because it helps clients find the right person for the job and it is visible in multiple places.
What should you write to catch the attention of a potential client?
There’s no one right way, but here are some possibilities. You can mention…
- Your specialization, niche, or specific industry
- Your level of experience
- The results you’ll deliver
- The value you’ll bring to the client’s project
- Any special relevant awards or credentials
Avoid using jargon, technical abbreviations, or excessive words. It should go without saying, but don’t copy another freelancer’s job title.
As an example, here is my current job title:
Experienced Architectural Designer, 3D & BIM Specialist.
This summarizes what I do and the types of projects I accept. It makes it clear that I’m not a graphic designer or web designer, even though in the past, I have taken on a few projects that would fall under the category of graphic design. The abbreviation “BIM” (Building Information Management) is somewhat of a technical word, but for my target audience who would be familiar with this term, I decided to include it to communicate my value and knowledge in this area.
Let’s take a look at more job titles:
- Email & Digital Marketing Specialist | 10+ Years Experience
- 3D Visualization Artist & Sketchup Designer
- Squarespace Expert
- Professional Translator (French <> English, Italian <> English)
- SEO Expert & Experienced Guest Post Writer on Authority Sites
- UK Copywriter and Blog Content Creator
The more descriptive and informative you can be, the better.
For example, if you’re experienced in designing logos, then use “Logo Specialist & Graphic Designer” as your job title, instead of “Graphic Designer.” Even better is if you were more specific: “Brand & Identity Designer for Female Entrepreneur Businesses.”
The words you choose for your job title are essential in helping you get high-quality clients. It’s one of the first details that clients will see about you.
When a potential client searches for freelancers, your job title will appear directly below your name on the search results page.
Edit, edit, and edit again. I’ve revised my job title 100+ times since I started freelancing.
Most job titles are between 3 to 8 words or less than 100 characters. You can use up to approximately 200 characters, but the full title won’t be visible in certain places.
- Helpful Tip! On PPH, your first name and job title (the first 34 characters) become part of the URL of your freelance profile, so be mindful about which words you use at the beginning of your job title. Furthermore, website search engines will take these words into account in search results. Use keywords and key phrases that match your skills to what potential clients are looking for.
Step 4. Create a Unique Cover Image
The cover image features at the top of your PPH profile. It’s a large banner image that gives you the opportunity to personalize your profile and create a unique look. Combined with your profile picture and portfolio, the cover image can give a positive visual impression of you to potential clients.
If you are a designer, your cover image should showcase your own work. It could be a combination of images or a custom-designed image.
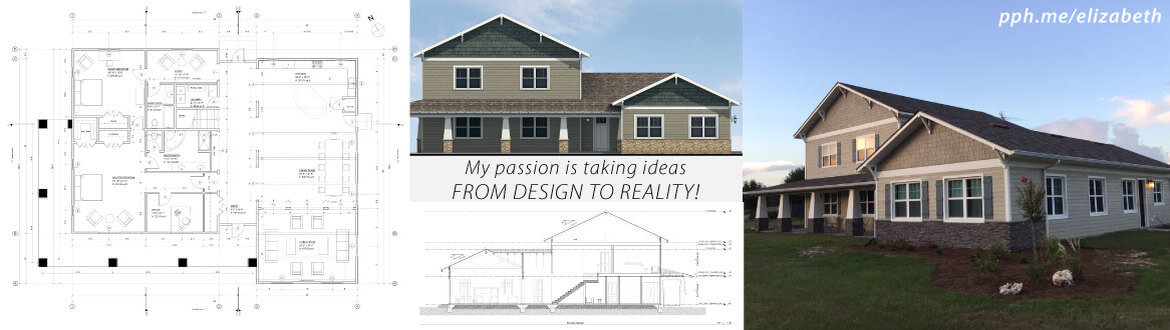
For example, in my cover image below, I feature one of the projects I’ve done – a design for a Craftsman-style family residence in Florida. I created a collage of images that included our construction drawings, a 2D illustrative rendering of the main elevation, and a photograph of the built house.
If you’re not a designer, you could hire one to help visualize what you do, or you could brainstorm creative ways to make a visual statement about who you are and what you offer.
Tips for designing the cover image:
- Aim to create a clean, high-quality, professional-looking image. Don’t use blurry, low-resolution images.
- Avoid using a stock image or something generic, unless you personalize it in some way.
- Make text large and readable. Avoid excessive amounts of text.
- Use the recommended image dimensions: 1600 x 500 pixels.
Here’s an amazing cover image from a top graphic design freelancer on PPH. She highlights her expertise and her credential as a Top Cert freelancer.

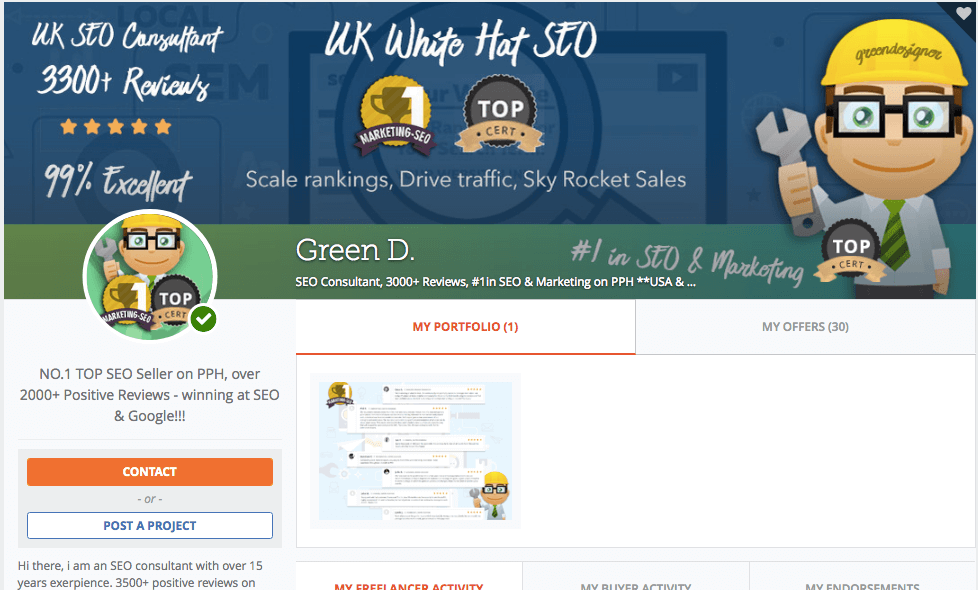
Here’s a creative cover image from a top SEO marketing consultant. This profile emphasizes his past success rate and 3300+ positive reviews, as well as the value he will bring to clients (drive traffic, increase sales).
Here’s another beautiful profile from a talented lifestyle content creator & copywriter who makes it clear who she works with (lifestyle brands, especially fashion, beauty, and health/fitness) and how she provides value to them (boosts digital presence and grows your brand online).

If you want to have a successful, engaging profile, I highly recommend adding a cover image.
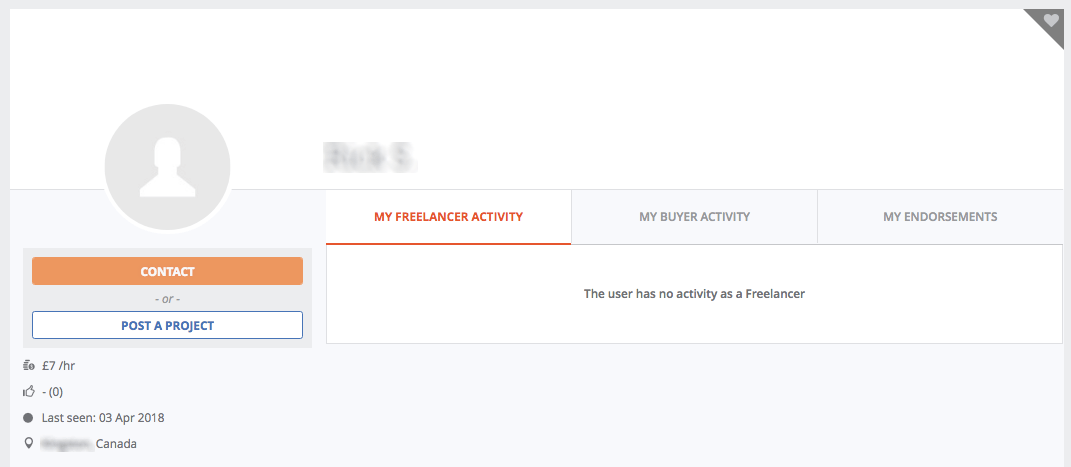
You don’t want to look like the profile below with no details!
Step 5. Add a Profile Picture
Make sure to use a professional, friendly picture of yourself. Dress well, smile, and have your photo taken in a well-lit, uncluttered environment. Let it highlight your personality.
A more professional photo will help you attract better clients and better-paying jobs. It gives the client an idea about who you are.
What not to do:
- Don’t use a selfie.
- Don’t use a poorly cropped photo of yourself amidst a group of people.
- Don’t use a blurry, dark photo.
- Don’t use a fake photograph.
- Don’t use a bad webcam photo, unless it’s your only option.
- Don’t use logos or generic imagery, unless you are representing an agency.
Hire a professional photographer, if you can afford it. Or, ask a friend to help you capture a nice-looking headshot. Look straight into the camera with a friendly smile, and crop the photo so your head is centered.
For example, my profile photo on PPH was taken by a professional photographer in a studio, and I was wearing business formal work attire.
Your profile photo is prominently displayed on both the desktop and mobile versions of the site.
Step 6. Set Your Hourly Rate
Now it’s time to set your hourly rate. This is one of the most challenging parts of creating your freelance profile, especially for new freelancers.
You may not know what to charge.
You may not be confident in charging what you’re worth.
Or, you may not know how this number comes into play when sending a proposal bid to a potential client.
Don’t worry, I’ve had all of these thoughts, too.
When I first started on PPH and other freelancing websites, I was very skeptical about the low paying rates I saw. I thought everyone was competing on price and charging as low as possible. It seemed like a race to the bottom in terms of fees. Naturally, I was concerned about making it work. At the same time, I was terrified of charging more and raising my hourly rate. I was worried I would lose my current clients, and I wouldn’t get any new clients.
In reality, there are fantastic clients on these platforms who are willing to spend money on good freelancers and quality work. The best hourly rate I’ve worked on a freelancing platform is at $150 per hour. Once I established my reputation as a reliable designer, I reached the point where I received a lot of private invites from new clients and direct inquiries from long-time, repeat clients. At times, I have to turn down potential projects due to so many inquiries.
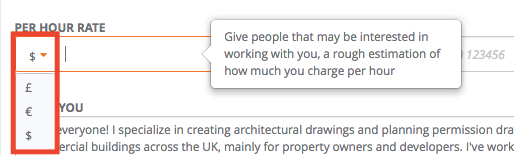
You can choose the currency of your hourly rate in the drop-down menu.
What should your hourly rate be? It will depend on your specialization, but a general guideline is:
- Beginners: $10 to $30 per hour (£10 to £22/hour)
- Experienced Freelancers: $30 to $60 per hour (£22 to £45/hour)
- Highly Experienced Freelancers: $60 to $150+ per hour (£45 to £100+/hour)
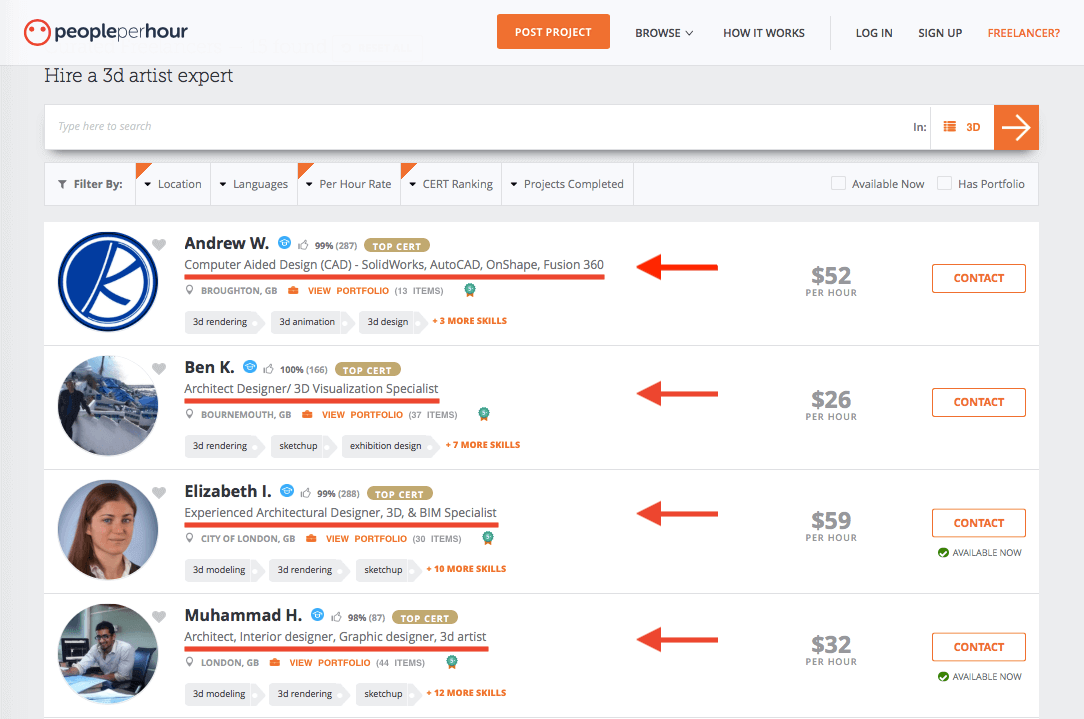
You can also keep in mind the default search queries when clients are browsing freelancers. In the screenshot below, you can see the search ranges of the per hour rates.
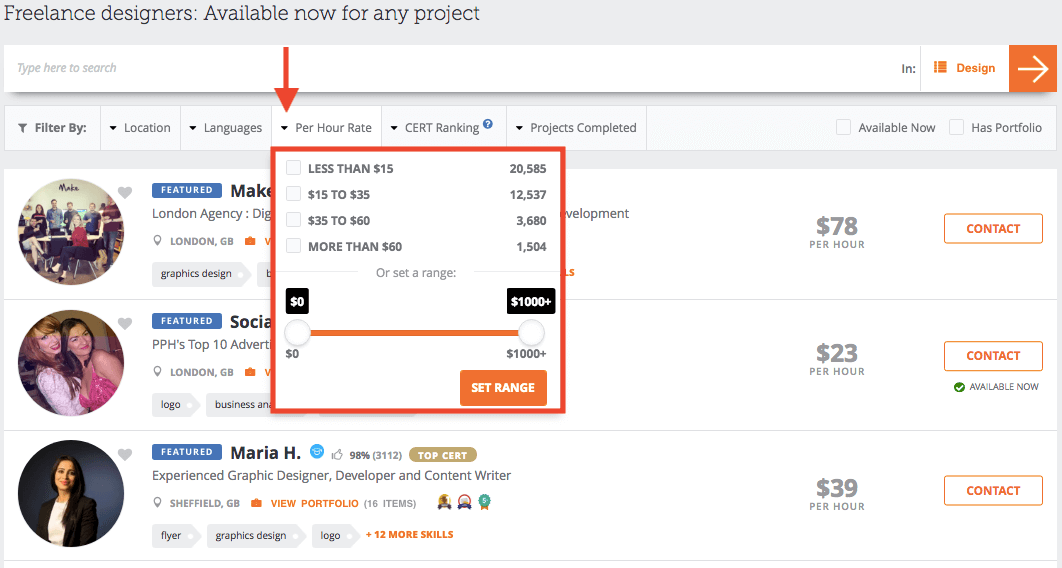
The two biggest lessons I’ve learned are:
- Never compete on pricing.
- Never feel ashamed of your pricing.
The value and experience you bring to projects are worth higher rates, and you should never feel like you need to justify or lower your rates when someone can’t afford you.
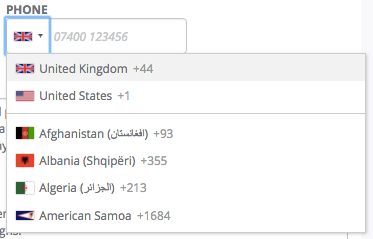
Step 7. Add Your Phone Number
The next step is very simple! PPH asks for your phone number and country code. You can use your real number or a temporary number. Either way, your phone number is never shown on your profile. It’s not disclosed to your clients or other freelancers, and you won’t get random phone calls. It’s only useful for PPH Customer Support to contact you if needed.
Step 8. Write Your ‘About You’ Description
Your freelance profile description gives a more detailed picture about who you are. You have the opportunity to highlight your unique skills and value to potential clients.
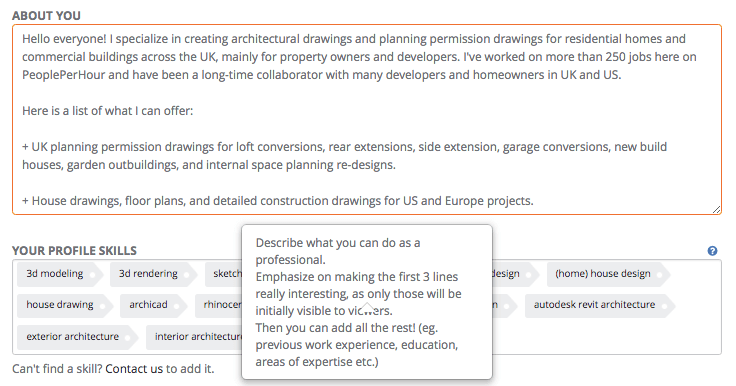
Your description should focus on three main areas:
- Who are you?
- What is your area of specialization and expertise?
- How do help solve your client’s problems?
There are so many ways to go about writing this text.
You can write a short and sweet description (only one paragraph long).
Or, you can write a long-form description.
I have seen top-ranked freelancers with very, very short descriptions. Personally, I have tested both long and short descriptions (after I had 50+ reviews on my profile), and I truly didn’t notice a difference either way.
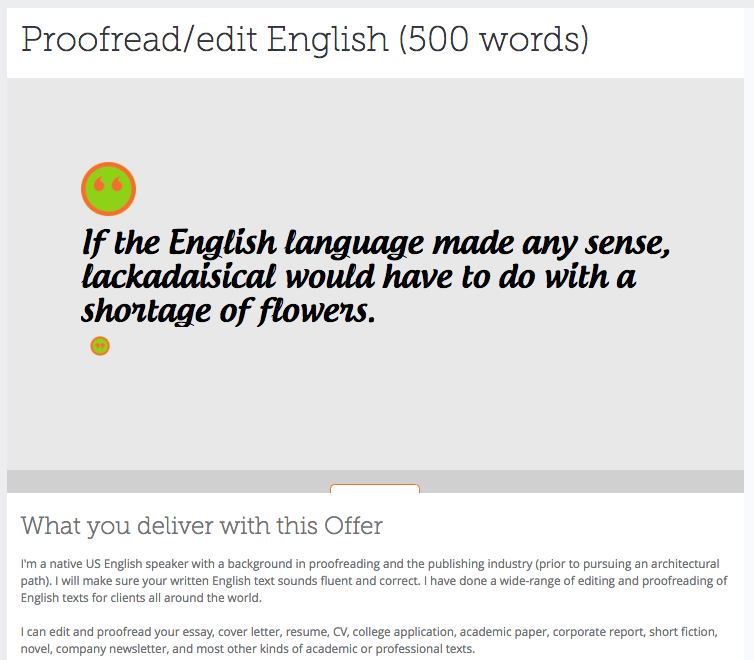
The first couple of sentences are the most important because your profile page will only show a small preview (the first 2-3 sentences) of your entire description, as shown below.

Above all, keep the client in mind. When potential clients are searching for a freelancer to hire, they want to know exactly how you can help them and whether you are qualified to do their project. They don’t care about your hobbies or personal interests. They want to know what’s in it for them.
For example, if you are a web designer, don’t simply write, “I design websites.” Your description could say something like: “I’ll build you a clean, professional business website that will help you get email subscribers and convert leads to sales.” (Only write this if you can actually do it.)
If you can achieve this with a short, one-paragraph description, then do that.
The client primarily cares that you’re qualified, confident, enthusiastic, and committed to complete their project.
If you don’t have formal work experience or educational background, then leave this information out, and don’t worry. You can focus on your self-taught skills and your strengths.
As you gain more freelancing experience, you can add more qualifications to your profile.
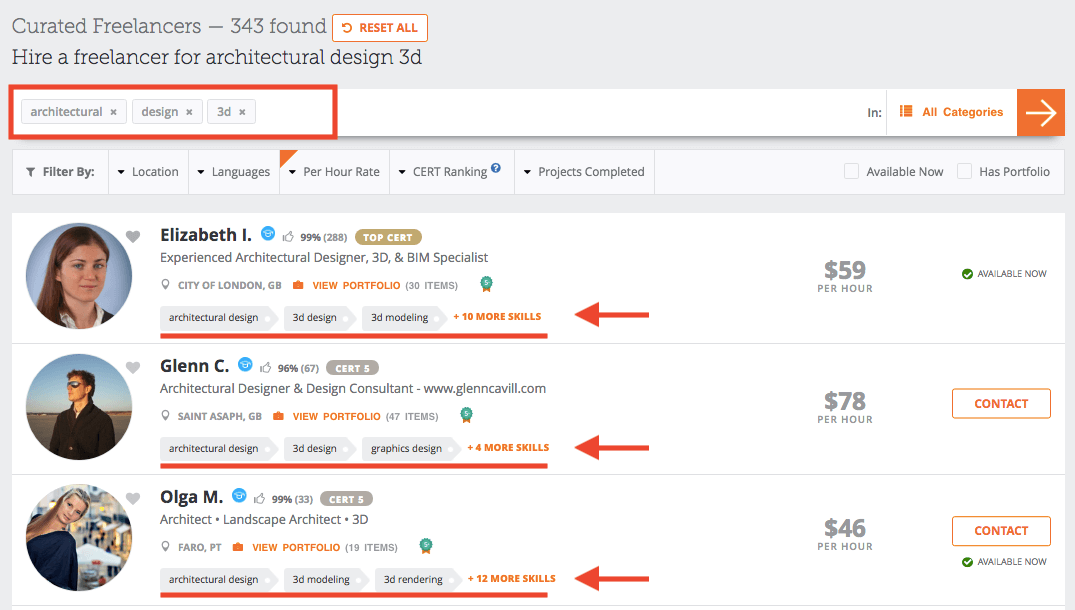
Step 9. Select Your Profile Skills
You can list a maximum of 15 skills. I recommend choosing a minimum of 5 skills that are the most relevant to your past experience and the types of new projects you want to do.
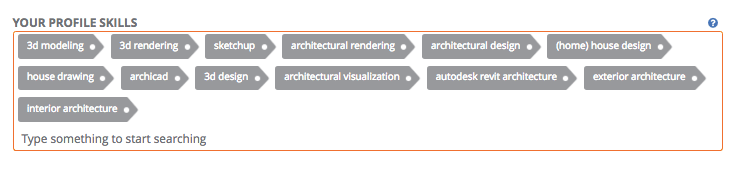
These skills are visible on the left-hand side of your profile (scroll down). They help match you to the right projects.
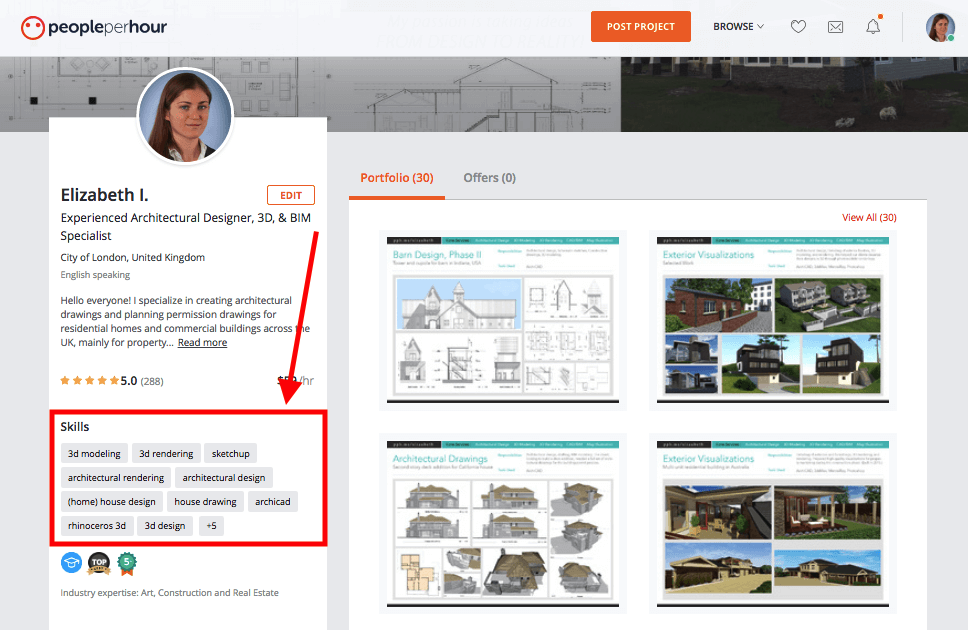
When a client is searching for someone with a specific skill, adding relevant skills will help you show up in search results.
You may be talented in multiple areas, but you shouldn’t necessarily list them all. You should focus on the relevant skills that you want to specialize in at this stage of your freelancing career.
For example, I used to offer freelance proofreading and editing on PPH.
I loved doing this, and I received a number of positive reviews.
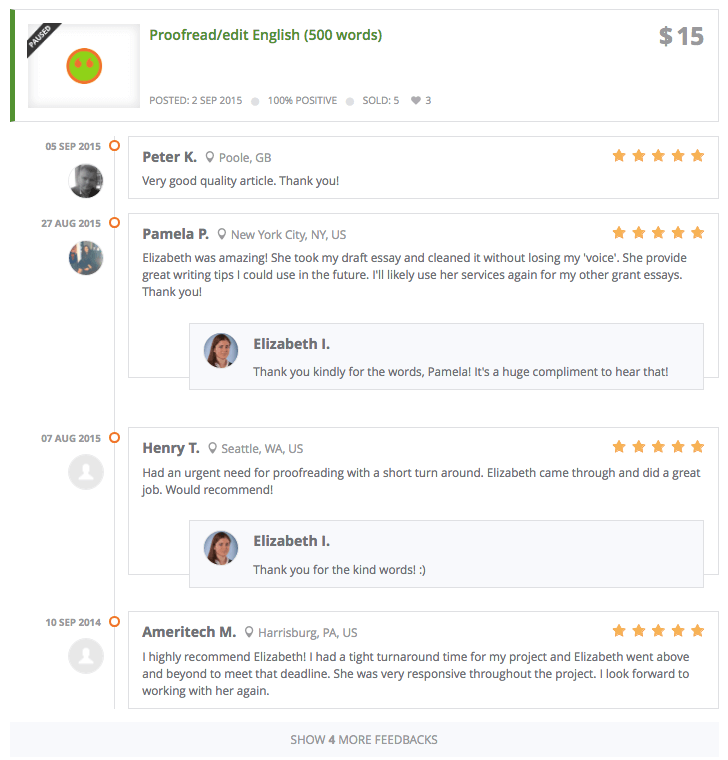
I had the skills “English proofreading” and “English editing” listed on my profile as well. However, I removed these skills from my profile when I decided to switch from being a generalist to a specialist!
You can change and adapt over time, but think in advance about the types of services you want to offer on this platform. It’s important to be selective about the skills displayed on your profile.
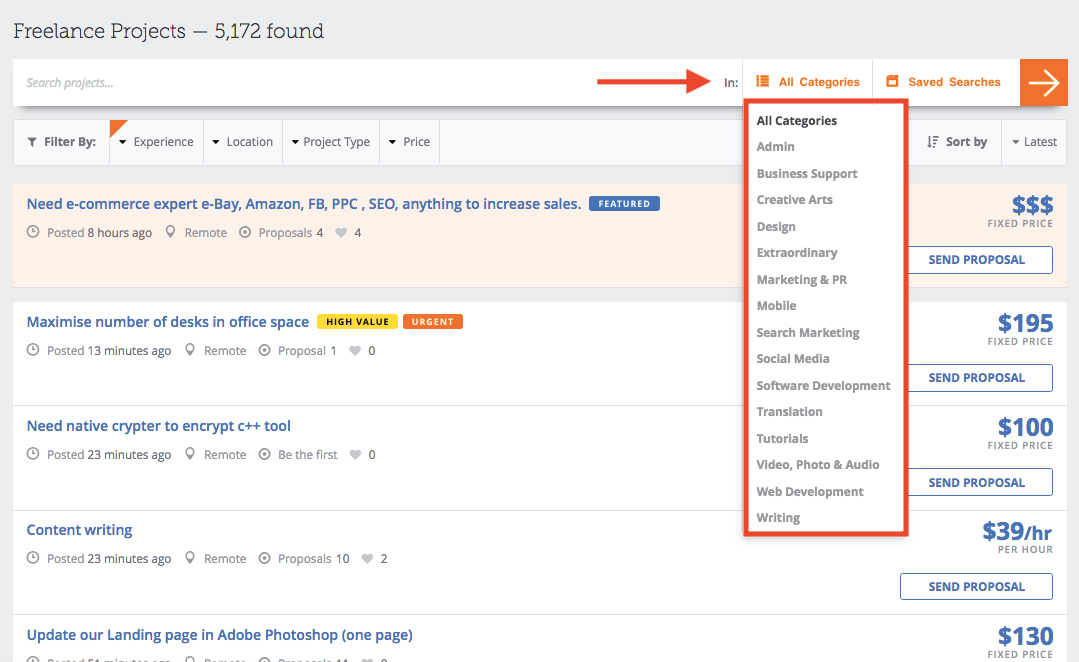
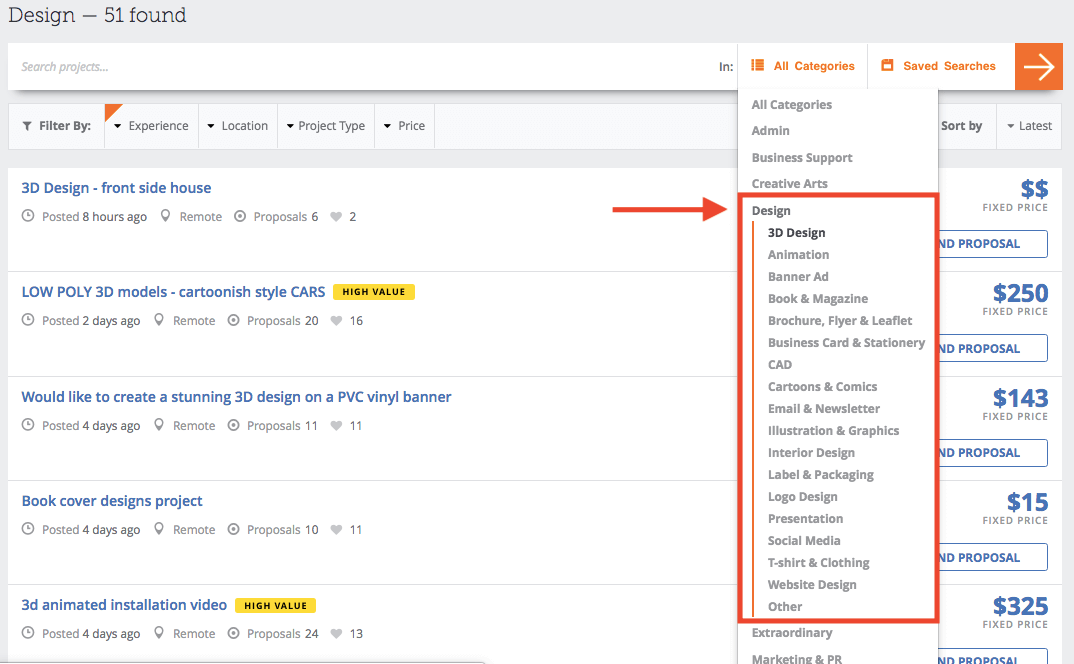
Your skills should also relate to the PPH categories. PPH categorizes projects broadly into 15 service categories, ranging from Admin to Design to Software Development.
Each category includes a number of subcategories. For example, in the Design category, you can find such subcategories as Animation, CAD, Email & Newsletter, Presentation, etc…
Browse different categories and subcategories to get a clear sense of what services are provided and where you fit in. Then, select the skills in which you are knowledgeable and want to offer to potential clients. You can choose your technical skills and program knowledge. Don’t add skills that you don’t have or don’t want to offer.
You can learn new skills to enhance your profile and expand your services as a freelancer. For more tips on improving your design skills, check out my post: 5 Simple Ways To Supercharge Your Design Skills.
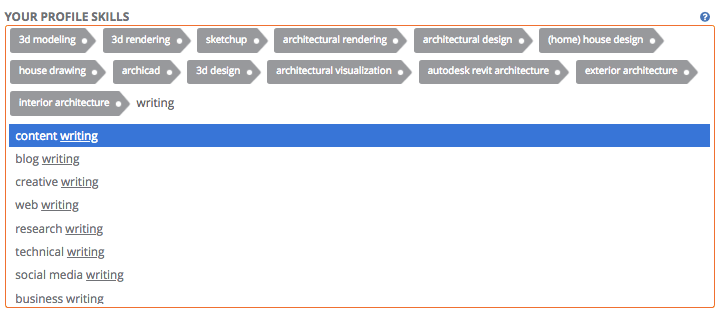
When you are editing your profile and adding skills, you can start to type in a broad word such as 3D, writing, or design, and PPH will suggest to you a list of more specific skills.
Let’s use “writing” as an example. If you type in writing and pause, it will suggest to you 10+ types of writing specialties. You can scroll to view all of them, and then select the most relevant types of writing. This will help you target your services.
Step 10. Add Your Language Skills
The official language of PeoplePerHour is English, as it’s a UK-based company. However, there are tons of clients and freelancers who come from other countries and speak other languages besides English. You can decide which languages you want to include or leave out of your profile.
For example, I only include English because it’s my native language. Even though I study and speak other languages, I’m an architectural designer, and so generally this is irrelevant information to my potential clients. My clients have come from all 6 continents and over 40 countries, but they have all been able to speak English.
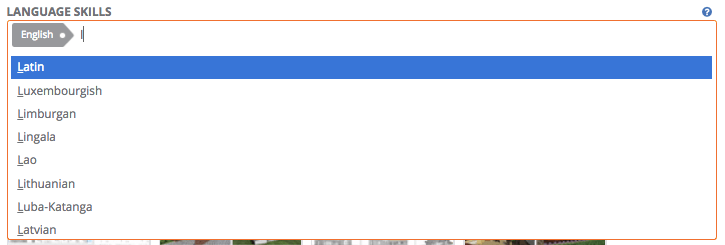
If you deal with translations, writing, proofreading, or academic specializations, your languages are likely more relevant to your work, so you should include all of them. It’s not possible to add ancient languages to your profile, but PPH does include Latin and a good number of smaller languages.
What if English is your second or third language?
You don’t have to be fluent in English to use a freelancing website or to list English on your profile. However, you should be honest about your English ability and at least be professionally competent.
If you are worried about your English language skills, then always use a proofreading and grammar tool such as Grammarly. You might even hire a freelance proofreader or a native English freelance writer to help you proofread or write your profile text and your portfolio descriptions. Make sure your freelance profile is written in clear English. Why? It’s your best opportunity to make a good impression on a potential client Thus, it’s worth the money to hire a freelance proofreader.
Step 11. Fill In Your Industry Expertise
This field is relatively new in PPH. I’m not sure why it was added, as I haven’t found it useful for the type of work I do. It also doesn’t list Architecture, Engineering, or anything remotely related! I recently decided to add Art, Real Estate, and Construction.
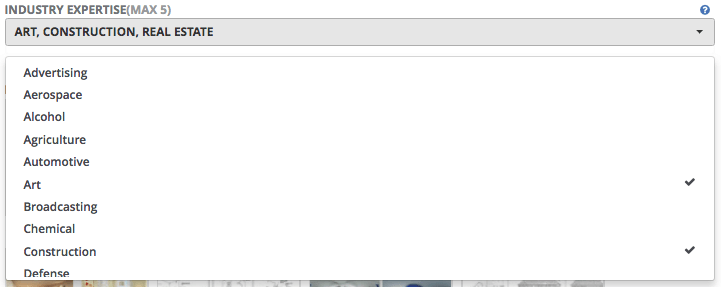
You may be in a different industry and may find it more useful to add to your profile in order to attract new clients. Or, you can ignore this field.
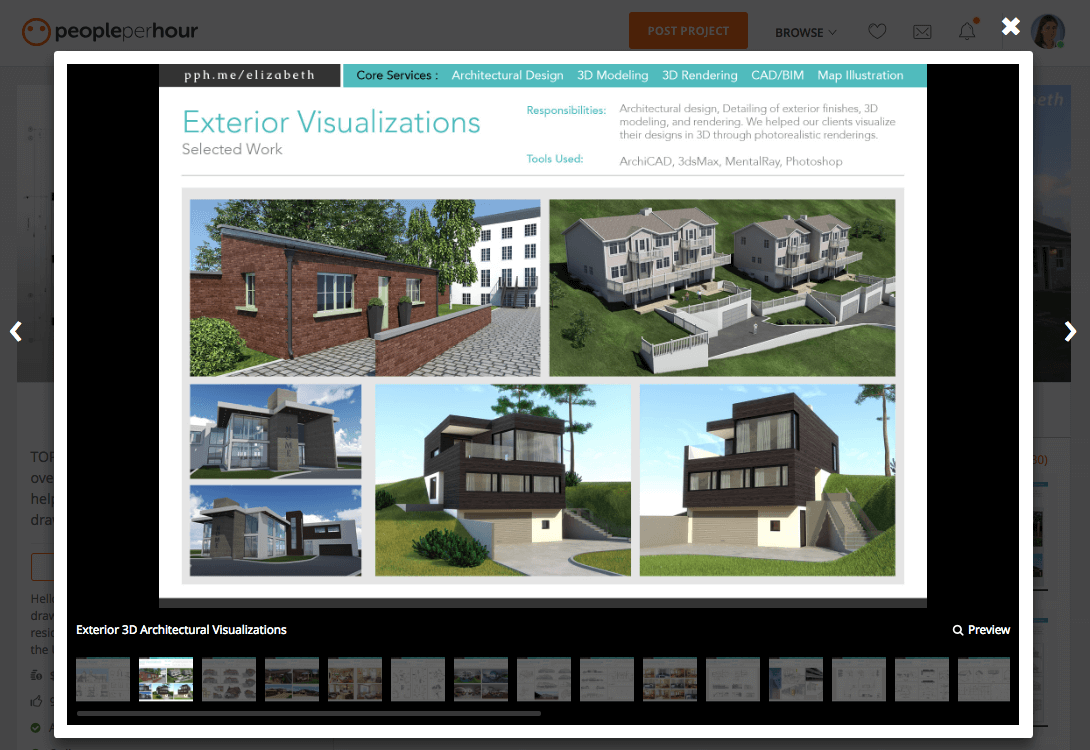
Step 12. Upload Your Portfolio
Your portfolio helps communicate your past experience in a visual way. It gives potential clients an idea about what you can do and the quality of work you can produce.
Showcase the best work you’ve done in your portfolio. Just make sure it reflects the kind of work you can do and want to do more of.
You can include academic work, past freelance work, or professional work.

For designers, you should consider adding…
- Images of your designs or drawings (JPGs or PNGs)
- Sketches
- Multi-page PDFs
- Videos
For non-designers, what should you put in your portfolio if you don’t have visual work?
- You can include writing samples.
- You can add screenshots of content you’ve created.
- You can create a one-page case study, featuring results you’ve achieved for a client.
- You can embed links from other sites.
Search top freelancers in your field to get an idea of what they showcase in their portfolio.
Don’t include too many examples of the same kind of work. A maximum of 3 examples is enough. It’s a good idea to show a variety of work in the different areas that you specialize.
As you finish projects and gain more experience, update your portfolio with new work.
On your profile page, the first 4 images are visible. You can put 70 images, 100 images, or more, but be sure to put your best work in those first 4 spots.
If a potential client wants to see more of your work, they can click View All.
A lightbox will appear, and they can check out all of your work in closer detail.
That’s all for the portfolio!
Step 13. Indicate Your Location
This is a straightforward step. You simply need to type in the city where you are based.

What if you are a digital nomad without a fixed address for a period of time?
What if you are a freelancer that has a home base but also spends time in multiple locations?
I fit under the second category, as over the years of freelancing, I have spent extended time in several places around Europe.
In my opinion, you can choose which location to mention in your profile. It can be based on the type of services you offer or the location you prefer best (out of the ones you spend time in). I have chosen to set mine at London, as I’ve lived there, regularly work on client projects there, and regularly do in-person site visits and measured surveys of buildings around the greater London area. I specialize in UK planning permission drawings, as well, so this is what makes sense for me.
Most clients who hire freelancers online nowadays understand that freelancers often travel or work from various locations.
After all, that’s one of the greatest benefits of being a freelancer – flexibility and freedom.
For remote projects, the location on your profile is not relevant to completing a job successfully. Thus, if you are trying to decide what to put, I suggest to list one of your main cities and not to worry or overthink this.
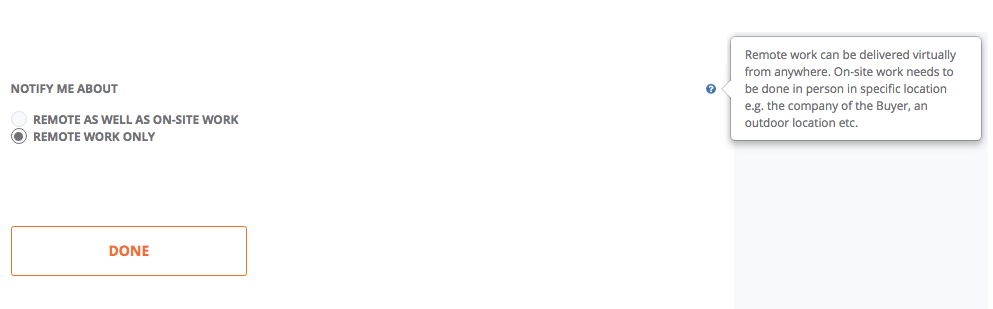
Step 14. Select Your Availability & Other Settings
You are nearly finished!
The last option is to select the types of projects you can handle.
Perhaps you are a videographer or photographer in a large city, and you plan to meet clients and do on-site work. Or, perhaps you are a location independent freelancer, and so you only plan to do remote work.
This is where you can specify which projects you want to be notified about.
Which option should you choose?
- Click Remote As Well As On-Site Work if your work needs to be done in person.
- Click Remote Work Only if you can deliver your work virtually from any location.
If you select Remote Work Only, it doesn’t mean you won’t ever be able to do in-person work. This only comes into play when a client posts a job that is open only to freelancers in a preferred country or a specific city (only freelancers with the right location will be able to send a proposal). However, most clients will post jobs as Remote, so freelancers anywhere in the world can send a proposal.
There is one last setting you can adjust: your availability.
On the upper menu bar, click on your profile photo. You will see a slider with a green or red icon. This is where you set your availability. Click on the circle to choose between Show as Busy or Available Now.
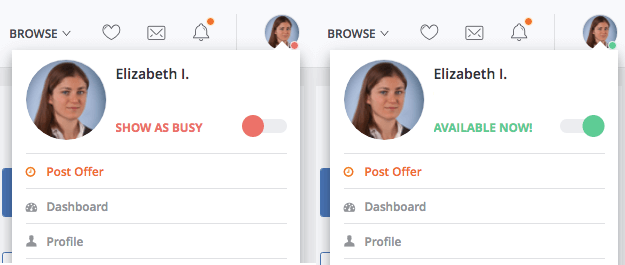
You can turn this on and off at any time. If you are busy or on holiday, you can switch to red to show that you’re not available. Clients don’t always notice this feature, though, so you should still monitor client emails and new invitations.
Step 15. Save Your Profile (Last step!)
Once you’ve finished all of the sections, click Done to save your profile.
Yayy, congratulations, you did it! You finished setting up your freelance profile on PPH!
You’ll see this screen below with suggestions to share your profile. You can also change your custom short link URL.
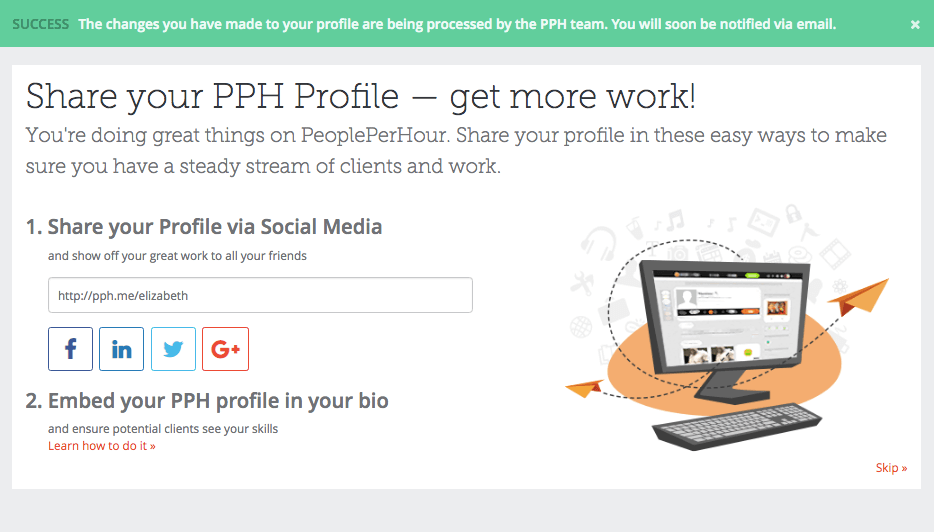
Your profile will then be reviewed by the PPH team to make sure it doesn’t violate any terms and conditions. It will likely be approved within 24-48 hours.
- Helpful Tip: You can edit and save your profile as many times as you wish! There is no limit to how many times you click Done and submit your revised profile.
A Final Note
Your freelance profile is not just something you “set and forget.”
It is a living document. It should evolve and change over time.
As you gain more experience and tackle bigger projects, make sure to revisit your profile and update your description, just as you would update your resume when applying to new jobs.
Setting up an impressive freelancing profile at the beginning stages takes a great deal of time and hard work. I recommend you spend several days or a week – whatever time is needed – until you have completed every aspect of your profile. It will be worth the effort!
The great thing about freelancing platforms such as PeoplePerHour and Upwork is that they are very dynamic places. You can constantly find new projects being posted and new clients searching for someone to hire for their projects.
It’s a great way to launch a freelancing career because you can have the opportunity to work on many different types of projects.
Regardless of whether you are a freelance designer, content creator, proofreader, virtual assistant, or any other profession, it’s essential to set up a complete, impressive freelance profile that highlights your expertise and showcases how you will solve your client’s problems.
I hope you were able to pick up some valuable tips for how to set up your freelance profile! If you have any questions, feel free to leave a comment or send me a message.

Hi, I’m Elizabeth! I’m an Web & Architectural Designer, Brand Strategist, Digital Course Creator, and Business Coach for Designers, Aspiring Architects, and Service-Based Entrepreneurs. I help designers and aspiring architects thrive in the design world by organizing their life, mastering their mindset, learning architecture & design skills, and building a professional career or online business they love. – Read my full story here!